Friday, May 23, 2014

Saving a SVG Image as PNG image on server

In this article i will share a code sample which i used to convert a svg image into BASE64 encoded image and then save that Image on server.
Here are the steps that I have used

1. I have a Razor view where I am using a AmChart to load chart, this chart is rendered using SVG.

2. Now I will add a canvas element in that View.

3. use Canvg to copy SVG image into Canvas element (created in Step 2).

4. Once image is copied in Canvas i will create a Image element and read Canvas content in that image , which will be BASE64 encoded.

5. Once image is loaded in that Img element then do a post back on server and pass content of that image (BASE64 encoded)


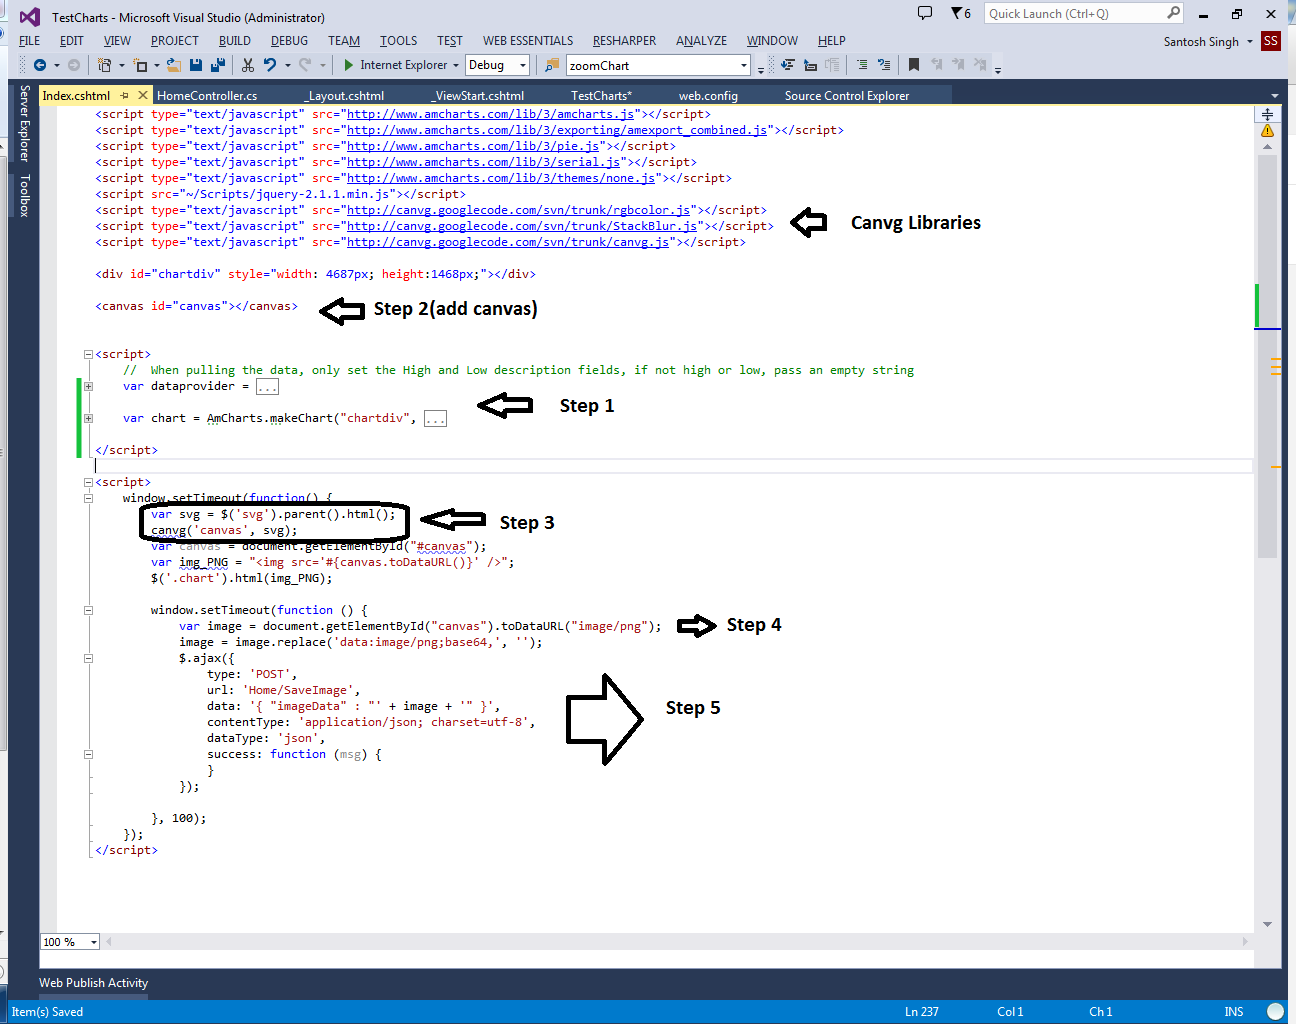
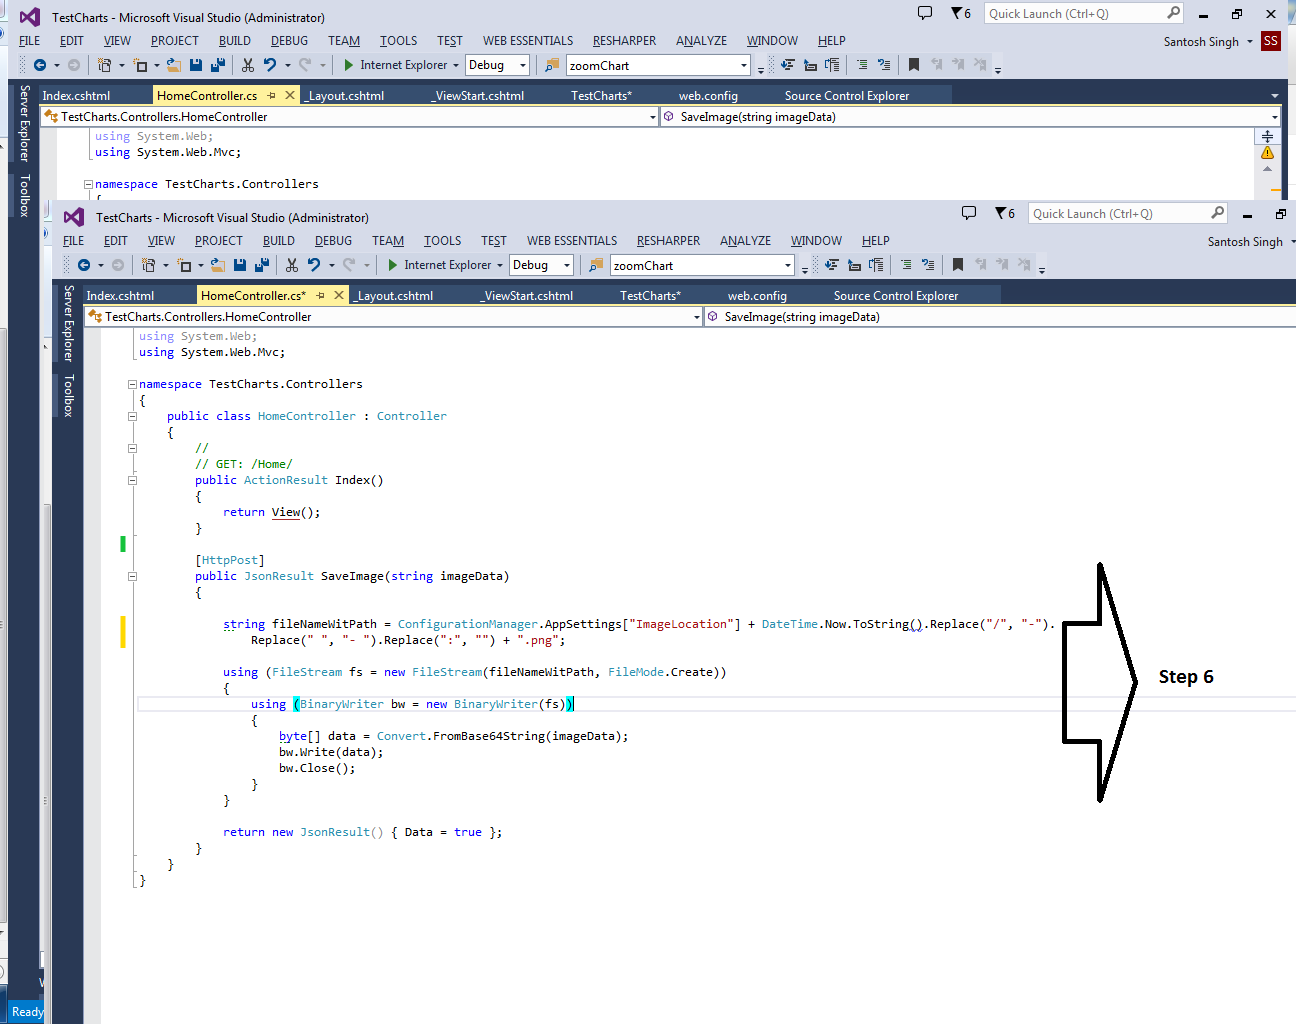
6. On server convert Base64 encoded Text stream into a Binary stream and save that Binary as an PNG file at your specified location.


You can check Sample Code Here.


Monday, March 17, 2014

Using RDLC with ASP.Net MVC to export report in PDF/Excel format

To export a report in PDF/Excel format using RDLC.


  1. Create a ASP.Net MVC web site.
  2. Add a RDLC report and creates its DataSources and Design the report as per requirement.
  3. Create an action method in your controller and use following code.

public ActionResult GetPdfReport(int month, int year, int snapshottypeid, long taskrunid)
{

//Step 1 : Create a Local Report.
LocalReport localReport = new LocalReport();

//Step 2 : Specify Report Path.
localReport.ReportPath = Server.MapPath("~/Content/UnAssignedLevelsReport.rdlc");

//Step 3 : Create Report DataSources
ReportDataSource dsUnAssignedLevels = new ReportDataSource();
dsUnAssignedLevels.Name = "UnAssignedLevels";
dsUnAssignedLevels.Value = dataSet.UnAssignedLevels;

ReportDataSource dsReportInfo= new ReportDataSource();
dsReportInfo.Name = "ReportInfo";
dsReportInfo.Value = dataSet.ReportInfo;

//Step 4 : Bind DataSources into Report
localReport.DataSources.Add(dsUnAssignedLevels);
localReport.DataSources.Add(dsReportInfo);

//Step 5 : Call render method on local Report to generate report contents in Bytes array
string deviceInfo = "<DeviceInfo>" +
"  <OutputFormat>PDF</OutputFormat>" +
"</DeviceInfo>";
Warning[] warnings;
string[] streams;
string mimeType;
byte[] renderedBytes;
string encoding;
string fileNameExtension;
//Render the report          
renderedBytes = localReport.Render("PDF", deviceInfo, out mimeType, out encoding, out fileNameExtension, out streams, out warnings);


//Step 6 : Set Response header to pass filename that will be used while saving report.
Response.AddHeader("Content-Disposition",
"attachment; filename=UnAssignedLevels.pdf");

//Step 7 : Return file content result
return new  FileContentResult(renderedBytes, mimeType);
}

4. While deploying code to a development/production server make sure following assemblies are referred from correct location and for them set CopyLocals as True.


Friday, January 31, 2014

Namespaces in Javascript

Namespacing in Javascript can be achieved in following ways

1. Single global variables
2. Prefix namespacing
3. Object literal notation
4. Nested namespacing
5. Immediately-invoked Function
6. Expressions
7. Namespace injection

Lets go in detail..

Single Global Variables:
Here we define a single Global variable which holds all methods and properties of object.

Ex.
var myExApplication =  (function () { 
        function(){
            //...
        },
        return{
            //...
        }
})();

Disadvantage: There are high chances of conflicts same variable could be used in some other part of code.


Prefix Namespacing:
Here we select a unique prefix namespace we wish to  use (in this example, myExApplication_)  and then define any methods, variables, or other objects after the  prefix as follows

Ex.
var myExApplication_propertyA = {};
var myExApplication_propertyB = {};
function myExApplication_myMethod(){ 
  //...
}

Disadvantage: We may end up having huge number of global variables thus tough manageable code.

Object Literal Notation:
Here an object contains a collection of key-value pairs with a colon separating each pair of keys and values, where keys can also represent new namespaces.

Ex.
var myExConfig = { //myExConfig is a JSON object and it contains all methods and props.

    language: "english",

    defaults: {
        enableGeolocation: true,
        enableSharing: false,
        maxPhotos: 20
    },

    theme: {
        skin: "a",
        toolbars: {
            index: "ui-navigation-toolbar",
            pages: "ui-custom-toolbar"    
        }
    }

}

Nested Namespacing:
Its an extension of Object Literal notation where an object includes another object and which in turn may include another object and so on to achieve a more granular name spacing.

Ex.
var myApp =  myApp || {};

myApp.routers = myApp.routers || {};
myApp.model = myApp.model || {};
myApp.model.special = myApp.model.special || {}


Immediately Invoked Function Expressions (IIFE)s
In IIFEs  an unnamed function is immediately invoked after it’s been defined and a namespace is passed as a parameter to contained objects.

Ex.
var namespace = namespace || {};

// here a namespace object is passed as a function 
// parameter, where we assign public methods and 
// properties to it
(function( o ){    
    o.foo = "foo";
    o.bar = function(){
        return "bar";    
    };
})( namespace );

console.log( namespace );


Namespace Injection:
This is another variation on the IIFE in which we “inject” the methods and properties for a specific namespace from within a function wrapper using this as a namespace proxy 

Ex.
var myApp = myApp || {};
myApp.utils =  {};

(function () {
  var val = 5;

  this.getValue = function () {
      return val;
  };
   
  this.setValue = function( newVal ) {
      val = newVal;
  }
      
  // also introduce a new sub-namespace
  this.tools = {};
    
}).apply( myApp.utils );  

// inject new behaviour into the tools namespace
// which we defined via the utilities module

(function () {
    this.diagnose = function(){
        return "diagnosis";   
    }
}).apply( myApp.utils.tools );

Saturday, April 13, 2013

ASP.Net MVC & ExtJs Grid [with Paging, Remote Soring and Filtering features] & Entity Framework Code First

In this post I am going to show how I created an Ext JS Grid and set up Paging, Remote Sorting and Filter features.

I have shared code at Github, feel free to download it and use it in your project.

In this project I have used Entity Framework code first for data access. After you download project you need to set up DB server name accordingly in Web.Config for application to run successfully.


In my solution I have 6 projects which, which are described as below:
1)MvcApplication.Core : It contains all core classes which will be used by other layers.
2)MvcApplication.DAL : It contains Models, Repository, DB context which is used by Main Application.
3)NewMvcApplication : Its main application which has a Person page that shows all persons.

Others are Test projects , as I have not written any Unit Test, I wont be discussing about them.

Once you run application first time , It will create all Tables and DB, once the DB is created you can insert some dummy data in your table.

Now I am going to discuss main components of my solution.
1) Persongrid.js  : It contains Javascript code which creates Person grid and sets up filter, Paging toolbar which is used by Grid. Here is the content of that file, As you can see here first I am creating a Data store, then using that Data store to create my ExtJs grid. I am also creating Paging toolbar to show my page numbers. I also specify filter information while defining columns.


Ext.Loader.setConfig({ enabled: true });

Ext.require([
    'Ext.grid.*',
    'Ext.data.*',
    'Ext.ux.grid.FiltersFeature',
    'Ext.toolbar.Paging',
    'Ext.ux.ajax.JsonSimlet',
    'Ext.ux.ajax.SimManager'
]);


Ext.onReady(function () {

    Ext.define('Person', {
        extend: 'Ext.data.Model',
        fields: [
        { name: 'FirstName', type: 'string' },
        { name: 'FirstName', type: 'string' },
        { name: 'MI', type: 'string' },
        { name: 'LastName', type: 'string' },
        { name: 'FaceBookId', type: 'string' },
        { name: 'Email', type: 'string' },
        { name: 'TwitterId', type: 'string' },
        { name: 'LinkedInId', type: 'string' },
        { name: 'BlogUrl', type: 'string' }
        ]
    });

    var store = Ext.create('Ext.data.Store', {
        model: 'Person',
        remoteSort: true,
        proxy: {
            type: 'ajax',
            url: '/Person/ListExtJs',
            reader: {
                type: 'json',
                root: 'data',
                totalProperty: 'totalCount'
            }
        },
        autoLoad: true,
        
    });

    // configure whether filter query is encoded or not (initially)
    var encode = true;

    // configure whether filtering is performed locally or remotely (initially)
    var local = true;

    var filters = {
        ftype: 'filters',
        encode: encode, 
        local: false
    };

    var grid = new Ext.grid.GridPanel({
        store: store,
        columns: [
           { header: 'Id', dataIndex: 'Id', hidden: true},
           { header: 'First Name', dataIndex: 'FirstName', width: 100, filterable:true },
           {
               header: 'Middle Initial', dataIndex: 'MI', width: 100
           },
           { header: 'Last Name', dataIndex: 'LastName', width: 100 },
           {
               header: 'FaceBook Id', dataIndex: 'FaceBookId', width: 100,
               filter: {
                   type: 'string'
                   // specify disabled to disable the filter menu
                   //, disabled: true
               }
           },
           {
               header: 'Email', dataIndex: 'Email', width: 100,
               filter: {
                   type: 'string'
                   // specify disabled to disable the filter menu
                   //, disabled: true
               }
           },
           {
               header: 'TwitterId', dataIndex: 'TwitterId', width: 100,
               filter: {
                   type: 'string'
                   // specify disabled to disable the filter menu
                   //, disabled: true
               }
           },
           { header: 'LinkedInId', dataIndex: 'LinkedInId', width: 100 },
           { header: 'BlogUrl', dataIndex: 'BlogUrl', width: 200 }
        ],
        
        renderTo: 'grid',
        width: 1000,
        autoHeight: true,
        bbar: new Ext.PagingToolbar({
            store: store,
            pageSize: 5,
            displayInfo: true,
            displayMsg: 'Displaying employees {0} - {1} of {2}',
            emptyMsg: "No employees to display"
        }),
        pageSize: 25,
        title: 'Employees',
        features: [filters],
    });
                
    grid.getStore().load({ params: {
        start: 0,
        limit: 25
    }
    });
});


2) I have added following method in my Person controller, here I am based on requested data I use filter and  sort data to return requested data.


      public ActionResult ListExtJs(int start, int limit,string sort, string filter)
        {
            int totalcount = db.Persons.Count();
            List<FilterData> filters;
            List<SortData> sorts;
            List<Person> persons;

            filters = FilterData.GetData(filter);
            sorts = SortData.GetData(sort);
            if (sorts.Count() == 0)
            {
                sorts.Add(new SortData() { direction = "ASC", property = "FirstName" });
            }
            string sortproperty = sorts[0].property;
            string sortdirection = sorts[0].direction;

            persons = db.Persons.Where(FilterData.GetWhereCriteria(filters)).OrderBy(sortproperty + " " + sortdirection).Skip(start).Take(limit).ToList();
            
            return Json(new { data = persons.ToArray(), totalCount = totalcount }, JsonRequestBehavior.AllowGet);

        }


3) I have created FilterData and SortData classes which are present in MvcApplication.Core they are class representation of data passed from ExtJs grid while loading data.


You can download this code from github using this link.

Saturday, March 30, 2013

Generating KnockOut ViewModel from a sql table

Here is the script that can be used to generate a Knockout V.M. from a table


DECLARE @TableName VARCHAR(100) = 'Persons'
DECLARE @ShortTableName varchar(100) = 'person'
DECLARE @TableSchema VARCHAR(3) = 'dbo'
DECLARE @result varchar(max) = ''


SET @result = @result + CHAR(13)


SET @result = @result + 'var ' + @TableName +  'VM = function('+ @ShortTableName +'){' + CHAR(13)

set @result = @result + 'var self = this ;' + char(13)

SELECT @result = @result + CHAR(13)
     + 'self.' + ColumnName + ' = ko.observable(' + @ShortTableName + ' ? ' + @ShortTableName +'.' +ColumnName +' : '''');' + CHAR(13)
FROM
(
    SELECT  c.COLUMN_NAME   AS ColumnName
        , 'var' AS ColumnType
        , c.ORDINAL_POSITION
FROM    INFORMATION_SCHEMA.COLUMNS c
WHERE   c.TABLE_NAME = @TableName and ISNULL(@TableSchema, c.TABLE_SCHEMA) = c.TABLE_SCHEMA
) t
ORDER BY t.ORDINAL_POSITION


SET @result = @result  + '}' + CHAR(13)


PRINT @result


Tuesday, March 26, 2013

Enabling Tracing for WCF Service

If you want to enable tracing for your WCF Service Copy Paste following code under configuration


<system.diagnostics>
    <sources>
      <source name="System.ServiceModel" switchValue="Information, ActivityTracing"
          propagateActivity="true">
        <listeners>
          <add type="System.Diagnostics.DefaultTraceListener" name="Default">
            <filter type="" />
          </add>
          <add name="ServiceModelTraceListener">
            <filter type="" />
          </add>
        </listeners>
      </source>
    </sources>
    <sharedListeners>
      <add initializeData="C:\temp\web_tracelog.svclog" type="System.Diagnostics.XmlWriterTraceListener, System, Version=4.0.0.0, Culture=neutral, PublicKeyToken=b77a5c561934e089"
          name="ServiceModelTraceListener" traceOutputOptions="Timestamp">
        <filter type="" />
      </add>
    </sharedListeners>
    <trace autoflush="true"/>
  </system.diagnostics>

Frequently Used JQuery functions for select list


Clearing a Select list:
$("#select_list_name").empty();


Adding an option in Select List:
$("# select_list_name ").append($('<option>', {
                            value: value_to_add,
                            text: text_to_add
                        }));
Here ‘value_to_add’ & text_to_add aer values that you want to be added.


To Check if an option exist by value in a Select List:
if ($('#select_list_name).find('option[value=' + value_to_search + ']').length > 0)
{
       //When an Item exist
}

Here value_to_search is the value that you want to searched in select list.


To select a particular value in select list after you find it:
$('#select_list_name).find('option[value=' + value_to_search + ']').attr("selected", "selected");


To read a selected value:
var selectedvalue = $("#select_list_name option:selected").val();


To set Margin value & Width for select list:
$('#select_list_name').css('margin-left', '5px');
$('#select_list_name ').css('width', (window.screen.width * 0.14) + 'px');